Knowledge Base
How to (re)start OBS and also start the stream automatically
This article may be especially interesting for people who stream for many hours or even 24/7. As you may have noticed at some point, is that the audio goes out of sync when you've been streaming for several hours. There are ways to prevent this, or to circumvent this, but often when this is happening, the best way to remedy this is to simply stop your OBS streaming, and start it again. But that will have to be done manually, meaning you have to be at the computer, physically. But there may be instances where you are streaming from your mobile device outside the house for example. Making it rather difficult to restart OBS on your stream-PC. One idea to prevent this from happening and to automate OBS restarts, on a set schedule. For example every 8,12 or 24 hours, or whatever you want to choose. This can actually be achieved quite easily. No matter what OS you're using. Below I've added the instructions for OBS on Windows, Linux, and MacOS.
Start and start stream automatically on Windows
To accomplish this on Windows we'll be using the task scheduler, and a batch file. A batch file is simply a text file that has the .bat file extension, and it is executable. It will run all the commands it holds in the .bat file from a command prompt window. You can always edit a .bat file by simply right clicking on it and "open with" notepad.
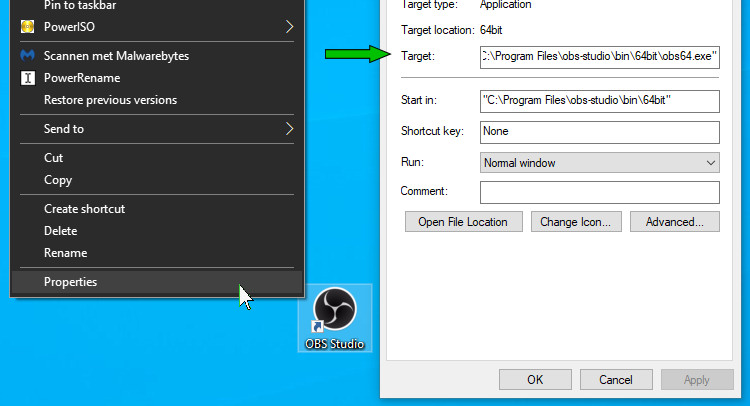
But before we do this, we should have a look at where your OBS is located exactly on your drive. Right-click the OBS shortcut icon you have on your desktop or start menu. Then choose properties, and it will show you a window that holds the exact location. Copy this line and close the window.
Now we can create our bat file, let's call it "OBS-RunStream". This can be done with Notepad by creating a new text file ad add the line below,
start /d "C:\Program Files\obs-studio\bin\64bit" obs64.exe --startstreamingwhile paying attention to see if the OBS location is the same as the line we copied earlier. If it is not, then replace it by pasting your address on the same spot between the " " signs.

Then save the file to any location you want on your drive. Then we'll need to rename the file to replace the file extension .txt to .bat. Windows will show a warning message, just click yes or accept.
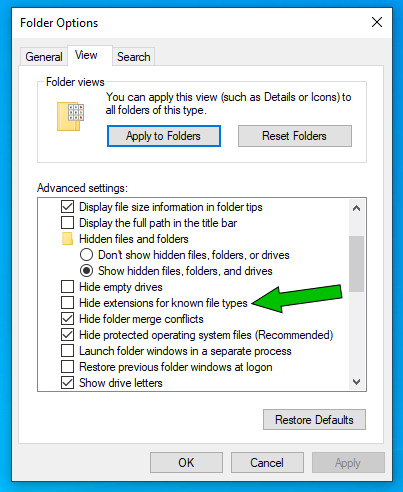
To see these file extensions and to easily change these, you may need to enable a Windows function first. Open a file explorer window, go the the "view" tab if you're on Windows 10, and then click "options". A window pops up, go to the second tab called "view" and scroll down and search for the option "Hide extensions for known file types". Make sure it is "off"
Now we're going to do the exact same thing once more, but this time we create a bat file that we'll be using to stop the OBS stream. Let's call it "OBS-StopStream.bat", and lets add the following line to it:
taskkill /F /IM obs64.exe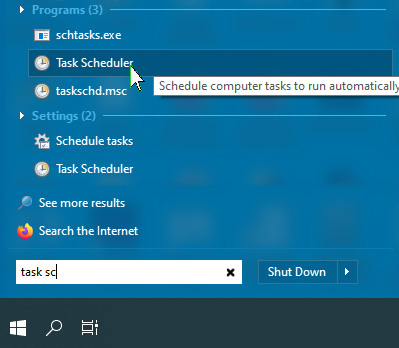
To test and see if it works you can double-click the bat files. But since we want to do this automatically, once every 12 hours, we need to use the Windows task scheduler. When you click start, just begin writing "and" it will appear so you can open it.
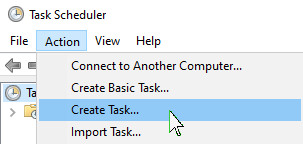
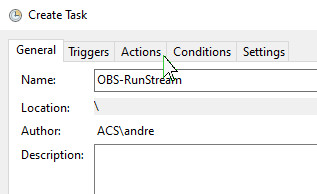
Now go to "action" and click "Create Task...", and enter a title for this task. Then open the "Actions" tab, click on "Browse" and select the first bat file that we made.
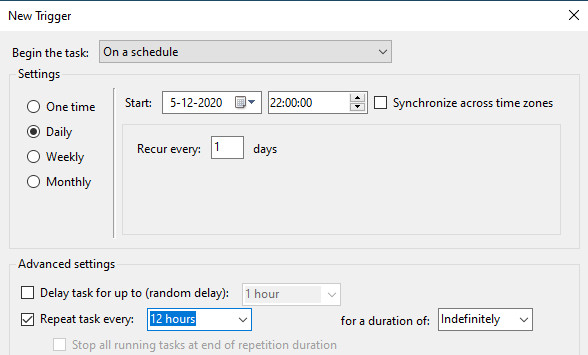
Now go back to the "Triggers" tab and click the button labeled "New...". In this window you can choose the schedule. I have no idea what would be the most ideal option here, as it all depends on your situation. If you notice that after 6 hours of streaming the audio is not in sync anymore, then you could choose to set it to run every 5 hours. In this example I'm choosing every 12 hours.
That's it! We've set a schedule to restart OBS every * hours and when it starts it will automatically start the stream. But we're not completely done here. We should always stop OBS before we start it. So...
Create a new schedule exactly as we did earlier, but this time choose the "OBS-StopStream.bat" file, and schedule it identical to our other task. Once the task is set and saved, go back to the task we made earlier, go to the "Trigger" tab and edit the already existing schedule. Enable the option "Delay task for up to (random delay)" option, and set it to 15 or 30 seconds. This should delay the task so it will allow the task to stop the stream first. That's it, now you are done. Unless you have a machine running Linux or MacOS cause I'll be showing how to set those up right now.
Stop/starting OBS on a Ubuntu Linux machine using CRON
Crontab may seem a bit difficult to understand at first sight. It's not actually so much difficult, as it is hard to remember what to do exactly. To be honest, I always use an easy generator specifically for crontab. There are plenty of these to be found but I rather like this one. So if you want to use a different schedule as I use in the example below, and I strongly advice you to do so because the schedule I use in this example doesn't make any sense, then you can also use earlier mentioned, or a different crontab generator.
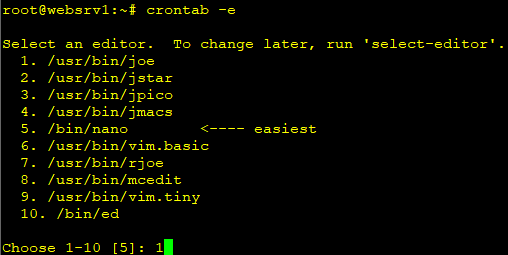
Start by opening a terminal and type "sudo crontab -e" and if this is the first time you're running it, then you will be asked to choose what text editor to use. If you don't know what to choose, choose Nano.
Once crontab has opened, you go the bottom of the list, if there is any, and add the line below, or one that is similar but with YOUR preferred schedule. This one will start streaming at 08:30 everyday and second line tells kill the OBS process at 18:30
30 08 * * * export DISPLAY=:0 && obs --startstreaming00 18 * * * killall obs
Once you've added these two lines, make sure that you hit the "enter" key at the very end of the last line, so the cursor will be on the line below. Just like you see in the next image. This may seem weird, but if you don't, you will get an error message that you must do this or else it won't work properly.
How to stop/start OBS automatically using cronnix on MacOS
If you are using Mac OSX for your encoder, you can use the Cronnix application (free) to schedule the start and stop tasks. Now since I don't own a machine with MacOS I can't tell you step by step what to do, but this should be enough so you can figure it out yourself.
The command that you need to use for starting OBS is:
open –a obs --args --startstreaming And the command you need to use to stop OBS is:
killall obsThat's basically it. You'll be able figure out the scheduling yourself.
Leave a Reply