Knowledge Base
Install and use Nginx Proxy Manager
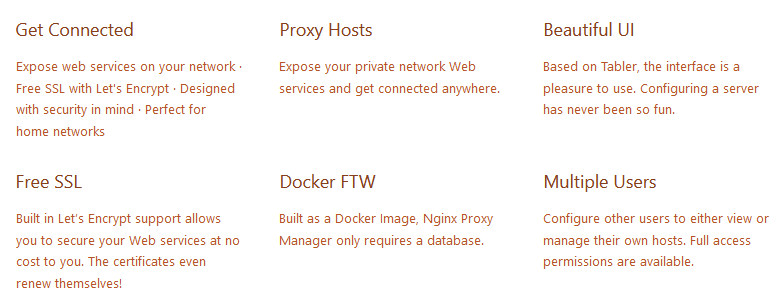
Nginx Proxy Manager is basically Nginx in a Docker container with a web interface to administer the reverse proxy configuration for Nginx. The project comes as a pre-built docker image that enables you to easily forward to your websites running at home or otherwise, including free SSL, without having to know too much about Nginx or Letsencrypt. Is that something you may be interested in, you may ask yourself?
Introduction
Let's say you are running several services from machines in your home that you want to make available on the internet, and let's say these services each run on their own specific port, in that case, you may be interested in setting up Nginx Proxy Manager. You may for example have a web-server running on port 80 and 443, and a secondary web-server on port 8080, and perhaps a NodeJS instance running on port 3000 and a monitoring dashboard that runs on port 4441. You could open these ports on your router/firewall and connect to these services by using the port address in the URL. There's nothing wrong with that! It may be an annoyance to remember all these ports, but more importantly, you perhaps want to use these services from your office location, but a corporate firewall is blocking all these ports that are not essential, so you won't be able to reach your services. Nginx Proxy Manager to the rescue!!

Set as many services on whatever ports you want, and make them available on the internet on ports 80 and/or 443. It is very unlikely that these ports will be blocked by a strict corporate firewall, since that would block all regular internet traffic for the network. Nginx Proxy Manager can manage certificates for you as well. This way, you can be sure that all the traffic to your services will be secured by a valid certificate.
Setting it up is pretty easy, and you'll finish this setup within 10 minutes if you decide to follow it. It has a requirement, and that is to have Docker and Docker compose installed on your Ubuntu, Windows, or Raspberry Pi that you want to use for Nginx Proxy Manager. But this is also very easy to set up. So let's start right there.
Installing Docker and Docker Compose
In this example, we're installing it on an Ubuntu 20.04 machine. On the official website, you can find instructions on what to do for other Linux distro's or operating systems. Go to https://docs.docker.com/get-docker/ for setting up Docker and https://docs.docker.com/compose/install/ for setting up Docker Compose.
Just follow these steps and in no-time you'll have Docker + Compose running.
sudo apt-get install apt-transport-https ca-certificates curl gnupg-agent software-properties-common
curl -fsSL https://download.docker.com/linux/ubuntu/gpg | sudo apt-key add -
sudo apt-key fingerprint 0EBFCD88
sudo add-apt-repository "deb [arch=amd64] https://download.docker.com/linux/ubuntu $(lsb_release -cs) stable"
sudo apt-get update
sudo apt-get install docker-ce docker-ce-cli containerd.io
You have finished installing Docker. These two simple steps will install Docker Compose.
curl -L "https://github.com/docker/compose/releases/download/1.28.2/docker-compose-$(uname -s)-$(uname -m)" -o /usr/local/bin/docker-compose
sudo chmod +x /usr/local/bin/docker-compose
You can easily test if your docker compose works by typing: docker-compose --version.

Continue to install the proxy manager docker
That was easy, wasn't it? You are now prepared to run Nginx Proxy Manager. First, we're going to stop any Apache or Nginx process that may be running on your server as they will conflict with Nginx Proxy Manager as it wants to use ports 80 and 443. To proxy traffic for the Apache or Nginx you already had running, you'll need to change the default port that they normally use. I for example have Apache running on port 8080 now and point to it using the proxy manager.
sudo systemctl stop apache2 nginx
Here we first create a folder that the proxy manager can use and download the files it needs.
sudo mkdir /opt/nginxproxymanager
Now we'll create a new file called : docker-compose.yml, like this:
sudo nano /opt/nginxproxymanager/docker-compose.yml
In the official documentation you are instructed to paste the following in this new file, but we decided that for now we don't want to use MySQL / MariaDB for the proxy manager but use SQLite instead. So we had to edit these lines a bit, and the results can be found just below. But you should decide what suits your needs the best and go with that. First the default config:
version: '3'
services:
  app:
    image: 'jc21/nginx-proxy-manager:latest'
    ports:
      - '80:80'
      - '81:81'
      - '443:443'
    environment:
      DB_MYSQL_HOST: "db"
      DB_MYSQL_PORT: 3306
      DB_MYSQL_USER: "npm"
      DB_MYSQL_PASSWORD: "npm"
      DB_MYSQL_NAME: "npm"
    volumes:
      - ./data:/data
      - ./letsencrypt:/etc/letsencrypt
  db:
    image: 'jc21/mariadb-aria:10.4'
    environment:
      MYSQL_ROOT_PASSWORD: 'npm'
      MYSQL_DATABASE: 'npm'
      MYSQL_USER: 'npm'
      MYSQL_PASSWORD: 'npm'
    volumes:
      - ./data/mysql:/var/lib/mysql
And here is what we used to have the proxy manager use a SQLite database.
version: '3'
services:
  app:
    image: 'jc21/nginx-proxy-manager:latest'
    ports:
      - '80:80'
      - '81:81'
      - '443:443'
    environment:
      #DB_MYSQL_HOST: "db"
      #DB_MYSQL_PORT: 3306
      #DB_MYSQL_USER: "npm"
      #DB_MYSQL_PASSWORD: "npm"
      #DB_MYSQL_NAME: "npm"
      # If you would rather use Sqlite uncomment this
      # and remove all DB_MYSQL_* lines above
      DB_SQLITE_FILE: "/data/database.sqlite"
      # Uncomment this if IPv6 is not enabled on your host
      # DISABLE_IPV6: 'true'
    volumes:
      - ./data:/data
      - ./letsencrypt:/etc/letsencrypt
  db:
    image: 'jc21/mariadb-aria:10.4'
    environment:
      MYSQL_ROOT_PASSWORD: 'npm'
      MYSQL_DATABASE: 'npm'
      MYSQL_USER: 'npm'
      MYSQL_PASSWORD: 'npm'
    volumes:
      - ./data/mysql:/var/lib/mysql
Once you saved the new docker-compose.yml file you're ready to start the Docker instance.
sudo docker-compose up -d
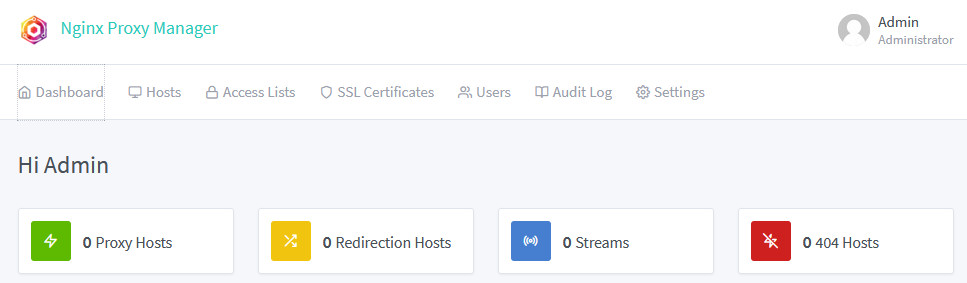
It will start by downloading required files and once this is done you can open a web browser and open the web interface of your Nginx Proxy Manager at http://server.ip.address:81/.
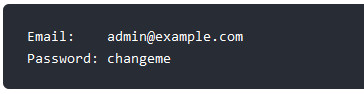
You'll be presented with a login prompt, and you need to use the default login details the first time. These are "admin@example.com" with password: "changeme". Once you logged in you will automatically be forced to change the password, and optionally the username also. That's it! Now you can start configuring your reverse proxy server.
Customizing your Nginx for the Proxy Manager
In case you need to customize your Nginx you can do so by adding your custom configuration snippet files at /data/nginx/custom . All these files are totally optional.
/data/nginx/custom/root.conf: Included at the very end of nginx.conf/data/nginx/custom/http.conf: Included at the end of the main http block/data/nginx/custom/stream.conf: Included at the end of the main stream block/data/nginx/custom/server_proxy.conf: Included at the end of every proxy server block/data/nginx/custom/server_redirect.conf: Included at the end of every redirection server block/data/nginx/custom/server_stream.conf: Included at the end of every stream server block/data/nginx/custom/server_stream_tcp.conf: Included at the end of every TCP stream server block/data/nginx/custom/server_stream_udp.conf: Included at the end of every UDP stream server block
Stopping Nginx Proxy Manager / Docker
To stop Nginx Proxy Manager, we'll need to stop the Docker container that it's running in. Here's how to do this. This first command will list all the running Docker instances.
sudo docker ps -a
This will return a list with all running Dockers, and each line starts with the ID of the Docker. We're going to use this ID to stop the container.

sudo docker container stop {docker ID}When you run the previous command again, you'll see that the Docker has exited.

