Setup a Nginx RTMP live-stream server & HLS video-player with Wordpress on Ubuntu
UPDATE: THIS BECAME A VERY POPULAR GUIDE THROUGH THE YOUTUBE VIDEO. I TESTED THIS GUIDE IN JAN. 2021 AND IT STILL HOLS UP. BUT EVEN THOUGH THIS GUIDE IS STILL SAFE TO FOLLOW, PLEASE ALSO BE AWARE THAT ELSEWHERE ON THIS WEBSITE YOU'LL FIND MORE RECENT AND PERHAPS COMPACTER HOW-TO GUIDES. YOU MAY WANT TO CHECK THESE OUT BEFORE CHOOSING TO FOLLOW THIS GUIDE. HAVING SAID THAT... THIS GUIDE STILL DOES SHOW SOME HANDY STEPS THAT YOU WON'T FIND IN THE MORE RECENT GUIDES.
0. INTRODUCTION
This guide was written up to support a new video on this Youtube channel. In the video I followed a draft of this guide, and made some necessary adjustments here and there. The guide on this page is the updated and final version.
1. PREPARATION
Get WinSCP here, and Putty here. Click here to see how to integrate these two together. Another good preparation would be to just watch the video first. It will perhaps help to put things in place in that brain of yours.
2. NOW LET'S GET STARTED SHALL WE?
Before you continue you should make sure your server is fully updated.
sudo apt update
sudo apt upgrade
This step is optional, and actually NOT advised by most people! Security-wise it would be better NOT to follow this next step. This command will enable the root account and this will allow us to set up our server without having to type sudo before every command and without having to type our password a gazillion times. If you decide to do this, be sure to revert it when you're done.
sudo su
passwd
	[enter new password twice]
If you do decide to enable the root account like I just did, remember to disable it again once you're done. Keep in mind that if you did not enable the root account you will need to enter "sudo" before most of the commands on this page.
For this next part it is very important that you know what a fully qualified host name truly means. Read up first! We are going to set the host name for our server. If you want to follow the rest of this guide it is required to use a fully qualified domain name. Make sure you know exactly what your domain name / host name is, that can be resolved to your IP, and has your web server respond to requests on port 80 and later also on 443. If you use a router with NAT you must make sure to open/forward these ports to your server.
sudo hostnamectl set-hostname HOST.DOMAIN.COM
3. INSTALL THESE USEFUL / REQUIRED PACKAGES
sudo apt-get install wget unzip software-properties-common dpkg-dev git make gcc automake build-essential zlib1g-dev libpcre3 libpcre3-dev libssl-dev libxslt1-dev libxml2-dev libgd-dev libgeoip-dev libgoogle-perftools-dev libperl-dev pkg-config autotools-dev gpac ffmpeg mediainfo mencoder lame libvorbisenc2 libvorbisfile3 libx264-dev libvo-aacenc-dev libmp3lame-dev libopus-dev unzip
4. INSTALL NGINX + RTMP MODULE
sudo apt install nginx -y
sudo apt install libnginx-mod-rtmp -y
5. INSTALLING PHP & EDITING PHP.INI
sudo apt install php7.3 php7.3-common php7.3-fpm php7.3-gd php7.3-mysql php7.3-imap php7.3-cli php7.3-cgi php7.3-curl php7.3-intl php7.3-pspell php7.3-recode php7.3-sqlite3 php7.3-tidy php7.3-xmlrpc php7.3-xsl php-memcache php-imagick php-gettext php7.3-zip php7.3-mbstring php-pear mcrypt imagemagick libruby memcached
The lines below will search for certain strings in our php.ini file and replace it with something else. If you prefer you can also use any text editor and make the changes manually by typing: nano /etc/php/7.3/fpm/php.ini, but we are ultra lazy so we prefer to use these lines:
sed -i 's/;cgi.fix_pathinfo=1/cgi.fix_pathinfo=0/g' /etc/php/7.3/fpm/php.ini
sed -i 's/upload_max_filesize = 2M/upload_max_filesize = 1024M/g' /etc/php/7.3/fpm/php.ini
sed -i 's/max_input_time = 60/max_input_time = 300/g' /etc/php/7.3/fpm/php.ini
sed -i 's/max_execution_time = 30/max_execution_time = 60/g' /etc/php/7.3/fpm/php.ini
What we did here is set cgi.fix_pathinfo to 0, ass this is required for Nginx. We also changed upload_max_filesize from 2 to 1024mb, increased max_input_time from 60 to 300 seconds, and increased max_execution_time from 30 to 60 seconds. The next line will change the default timezone, so make sure to change it so it will reflect your timezone.
sed -i 's/;date.timezone =/date.timezone = "Europe\/Amsterdam"/g' /etc/php/7.3/fpm/php.ini
It won't hurt to restart the php-fpm process at this time.
sudo systemctl restart php7.3-fpm
6. INSTALL MARIADB (OR MYSQL) AND CREATE A DATABASE FOR WORDPRESS
sudo apt install mariadb-server mariadb-client phpmyadmin -y
When asked to choose between Apache and Lighttpd choose NONE. After the install is complete, enter this command:
mysql_secure_installation
Answer all the questions as you prefer or just accept all the defaults. After this restart the database engine.
sudo systemctl restart mysql
Now we should be able t login to the database engine like this:
mysql -u root -p
[enter the password you set earlier]
You are now in the command prompt for MariaDB. We now need to create a new database for our Wordpress installation. Also we'll create a new user that has access only to this new database. This should go without saying but be sure to change "YourPassword" to your password. We do this by entering these commands. You can copy/paste them all at once.
CREATE DATABASE wordpress;
grant all privileges on wordpress.* TO 'wordpress'@'localhost' identified by 'YourPassword';
FLUSH PRIVILEGES;
quit;
These next two steps are both optional. Please continue reading first to see if these steps are suited for you or not. If not, you can skip to the next step.
This will create a new root account that has access from remote locations. Be aware that this is not required, it's a personal preference. This is however required if you want to manage your databases from a different machine using HeidiSQL for example. Keep in mind that it is a lot more secure NOT to do this, so skip ahead to the next step if you don't need this functionality, or when you're not sure, or in doubt, also skip to the next step.
CREATE USER 'root'@'%' IDENTIFIED BY 'YourPassword';
GRANT ALL ON *.* TO 'root'@'%';
FLUSH PRIVILEGES;
Use the following commands to create a new admin user for MariaDB. Be sure to change "username" and "YourPassword" to whatever you like.
CREATE USER 'username'@'%' IDENTIFIED BY 'YourPassword';
GRANT ALL ON *.* TO 'username'@'%';
GRANT ALL PRIVILEGES ON *.* TO 'username'@'%';
FLUSH PRIVILEGES;
This step is also optional. It might be required to use these commands if you want to be able to login with the root account from PHPMyAdmin. Only do this if you are certain you want to allow login with the root account on PHPMyAdmin.
use mysql;
update user set plugin='' where User='root';
FLUSH PRIVILEGES;
quit;
When you're done you should restart the database engine again.
sudo systemctl restart mysql
7. CREATE SYMLINK TO ENABLE PHPMYADMIN
You may have noticed that several steps ago we installed PHPMyAdmin. We need to perform some additional steps to allow us to use it. Please be aware that you must change "yourhostname" in the commands below with your fully qualified hostname like for example: yourhost.domain.com.
mkdir -p /var/www/yourhostname
ln -s /usr/share/phpmyadmin /var/www/yourhostname/phpmyadmin
chown -R www-data: /var/www/yourhostname
You should now be able to open it and manage your databases like this: http://yourhostname/phpmyadmin
8. CLONING THE RTMP GIT AND CREATE SOME NEW FILES
cd /usr/src
git clone https://github.com/arut/nginx-rtmp-module
cp /usr/src/nginx-rtmp-module/stat.xsl /var/www/html/stat.xsl
cp /usr/src/nginx-rtmp-module/stat.xsl /var/www/yourhostname/stat.xsl
Please note that the last line contains "yourhostname" which should be edited by you first.
Create a new file in your website's root folder(s).
nano /var/www/html/crossdomain.xml
Copy & paste the next five lines in our new file.
<?xml version="1.0"?>
<!DOCTYPE cross-domain-policy SYSTEM "http://www.adobe.com/xml/dtds/cross-domain-policy.dtd">
<cross-domain-policy>
<allow-access-from domain="*"/>
</cross-domain-policy>
Copy it to other folders that contain a website that you want to use for streaming.
cp /var/www/html/crossdomain.xml /var/www/yourhostname/crossdomain.xml
Create another new file also in your website root folder(s).
nano /var/www/yourhostname/phpinfo.php
Paste the following in it.
<?php phpinfo(); ?>
Make sure ownership belongs to user www-data and group www-data.
chown -R www-data:www-data /var/www/yourhostname
chown -R www-data:www-data /var/www/html
9. CREATE SOME REQUIRED FOLDERS
It's fine if you get an error message that the folder could no be created because it already exists. Just ignore it.
mkdir /var/log/nginx
mkdir -p /var/livestream/hls
mkdir -p /var/livestream/dash
mkdir -p /var/livestream/recordings
chown -R www-data:www-data /var/log/nginx
chown -R www-data:www-data /var/livestream
10. EDIT THE NGINX CONFIGURATION
For now we'll create a config without any variables related to https. We'll do that later on. It is very important to change all the lines that contain "yourhostname" or "yourdomain" in to your fully qualified, working host name if you want to create valid certificates later on.
nano /etc/nginx/nginx.conf
Either edit the file or just simply remove everything and paste the following.
user www-data;
worker_processes 1;
pid /run/nginx.pid;
include /etc/nginx/modules-enabled/*.conf;

events {
	worker_connections 768;
	# multi_accept on;
	}

http {
	sendfile on;
	tcp_nopush on;
	tcp_nodelay on;
	keepalive_timeout 65;
	types_hash_max_size 2048;
	# server_tokens off;
	# server_names_hash_bucket_size 64;
	# server_name_in_redirect off;
	include /etc/nginx/mime.types;
	default_type application/octet-stream;

	gzip off;
	# gzip_vary on;
	# gzip_proxied any;
	# gzip_comp_level 6;
	# gzip_buffers 16 8k;
	# gzip_http_version 1.1;
	# gzip_types text/plain text/css application/json application/javascript text/xml application/xml application/xml+rss text/javascript;

	access_log /var/log/nginx/access.log;
	error_log /var/log/nginx/error.log;

	include /etc/nginx/conf.d/*.conf;
	include /etc/nginx/sites-enabled/*;
	}

rtmp {
	access_log /var/log/nginx/rtmp_access.log;
	server {
		listen 1935;
                chunk_size 8192;

                application live {
                        live on;
			meta on;
                        record off;
			interleave off;
			wait_key on;
			wait_video off;
			idle_streams off;
			sync 300ms;
			session_relay on;
			max_connections 1000;
			allow publish all;
			allow play all;
			hls off;
			dash off;

			# on_publish http://yourdomain.com/plugin/Live/on_publish.php;
			# on_play http://yourdomain/plugin/Live/on_play.php;
			# on_record_done http://yourdomain/plugin/Live/on_record_done.php;

			push rtmp://localhost/hls;
			push rtmp://localhost/dash;

		}
		application hls {
			live on;
			record off;
			meta copy;
			allow publish 127.0.0.1;
			allow play all;

			hls on;
			hls_nested on;
			hls_cleanup on;
			hls_sync 100ms;
			hls_fragment 2s;
			hls_playlist_length 10s;
			hls_path /var/livestream/hls;
			}
		application dash {
			live on;
			record off;
			allow publish 127.0.0.1;
			deny publish all;
			allow play all;

			dash on;
			dash_nested on;
			dash_cleanup on;
			dash_fragment 5s;
			dash_playlist_length 20s;
			dash_path /var/livestream/dash;
			}
		application vods {
			play /var/livestream/recordings;
			allow play all;
			}
		application vods_http {
			play ;
			allow play all;
			}
		}
}11. EDIT THE VIRTUAL HOST'S CONFIGURATION
Previously we edited the primary Nginx configuration file, next is to edit the config file for our virtual host for your website. Obviously the same thing as earlier is applicable here: replace all the "yourhostname" entries with your own domain or host name.
nano /etc/nginx/sites-available/yourhostname.conf
server {
	listen 80;
	listen [::]:80;

	server_name yourhostname;

	root /var/www/yourhostname;
	index index.php index.html index-nginx.html index.htm;

	add_header Strict-Transport-Security "max-age=63072000;";
	add_header X-Frame-Options "DENY";

	location / {
		add_header Cache-Control no-cache;
		add_header Access-Control-Allow-Origin *;
		try_files $uri $uri/ =404;
		}
	location ~ \.php$ {
		include snippets/fastcgi-php.conf;
		fastcgi_pass unix:/var/run/php/php7.3-fpm.sock;
		# fastcgi_pass 127.0.0.1:9000;
		}
        location /stat {
		rtmp_stat all;
		rtmp_stat_stylesheet stat.xsl;
		#auth_basic Restricted Content;
		#auth_basic_user_file .htpasswd;
		}
        location /stat.xsl {
		root html;
		}
        location /control {
		rtmp_control all;
		#auth_basic stream;
		#auth_basic_user_file .htpasswd;
		}
	location ~ /\.ht {
		deny all;
		}
        location /hls {
		types {
		application/vnd.apple.mpegurl m3u8;
		video/mp2t ts;
		}
		autoindex on;
		alias /var/livestream/hls;

		expires -1;
		add_header Strict-Transport-Security "max-age=63072000";
		add_header Cache-Control no-cache;
		add_header 'Access-Control-Allow-Origin' '*' always;
		add_header 'Access-Control-Expose-Headers' 'Content-Length';
		if ($request_method = 'OPTIONS') {
		add_header 'Access-Control-Allow-Origin' '*';
		add_header 'Access-Control-Max-Age' 1728000;
		add_header 'Content-Type' 'text/plain charset=UTF-8';
		add_header 'Content-Length' 0;
		return 204;
		}
	}
        location /dash {
		types{
		application/dash+xml mpd;
		video/mp4 mp4;
		}
		autoindex on;
		alias /var/livestream/dash;

		add_header	Strict-Transport-Security "max-age=63072000";
		add_header Cache-Control no-cache;
		expires -1;
		add_header 'Access-Control-Allow-Origin' '*' always;
		add_header 'Access-Control-Expose-Headers' 'Content-Length';
		if ($request_method = 'OPTIONS') {
		add_header 'Access-Control-Allow-Origin' '*';
		add_header 'Access-Control-Max-Age' 1728000;
		add_header 'Content-Type' 'text/plain charset=UTF-8';
		add_header 'Content-Length' 0;
		return 204;
		}
	}
}Active the virtual host in Nginx by linking it from sites-enabled to sites-available:
ln -s /etc/nginx/sites-available/yourhostname.conf /etc/nginx/sites-enabled/
nginx -t
sudo systemctl restart nginx
12. LET'S ENCRYPT SOME CERTIFICATES
sudo apt install python-certbot-nginx -y
You can, if you want, add more domains in the command below, for example your domain and additionally www.domain or something. Just use "-d domainname -d www.domainname -d domainname2"
certbot --nginx -d yourhostname
Choose YES when prompted to have certbot automatically create a forward for you from http to https. This will edit your virtual hosts configuration file automatically.
Keep an eye on the results to see if it all went well, keep an eye out for errors.
nginx -t
sudo systemctl restart nginx
By default, Nginx will use the default DHE (Ephemeral Diffie-Hellman) parameters provided by OpenSSL. This uses a weaker key that will result in lower scores with certificate rating. The smart thing to do is build your own here. You can create any bit key, but let's go ahead and use 4096 bits.
This may take a very long time. Don't be surprised if this process will take more as 10 minutes. So you might as well make yourself a cup of coffee or something in the meantime.
openssl dhparam -out /etc/letsencrypt/ssl-dhparams.pem 4096
Now we edit the configuration file for the virtual host that is your website.
nano /etc/nginx/sites-available/yourhostname.conf
Make sure that the config file has lines that are like the ones below, and add them or edit the file accordingly.
listen 443 ssl http2;
listen [::]:443 ssl http2;
ssl_certificate /etc/letsencrypt/live/yourhostname/cert.pem;
ssl_certificate_key /etc/letsencrypt/live/yourhostname/privkey.pem;
include /etc/letsencrypt/options-ssl-nginx.conf;
ssl_dhparam /etc/letsencrypt/ssl-dhparams.pem;The next line is probably not in your config file so add it manually if you want to get A+ ratings for your certificates. This is optional.
ssl_trusted_certificate /etc/letsencrypt/live/yourhostname/chain.pem;Have a look at, and optionally change the config file that was created by Letsencrypt and gets included by Nginx.
nano /etc/letsencrypt/options-ssl-nginx.confssl_session_cache shared:le_nginx_SSL:1m;
ssl_session_timeout 1d;
ssl_session_tickets off;
ssl_protocols TLSv1.2;
ssl_prefer_server_ciphers on;
ssl_ciphers "EECDH+AESGCM:EDH+AESGCM:AES256+EECDH:AES256+EDH";
ssl_ecdh_curve secp384r1;
ssl_stapling on;
ssl_stapling_verify on;
add_header Strict-Transport-Security "max-age=15768000; includeSubdomains; preload;";
add_header Referrer-Policy "no-referrer, strict-origin-when-cross-origin";
add_header X-Frame-Options SAMEORIGIN;
add_header X-Content-Type-Options nosniff;
add_header X-XSS-Protection "1; mode=block";When all is done and you restarted Nginx once more, visit ssllabs.com (https://www.ssllabs.com/ssltest/analyze.html?d=yourhostname) to test your certificate and see it's rating. It should give you an A+ rating..
If it doesn't, don't worry about it. As long as everything is working, and you don't have OCD like me, you can just skip the whole certificate rating part of these instructions.
13. SETUP VIDEOJS AND TEST YOUR STREAM WITH OBS
If you're following this guide just to setup live-streaming to Wordpress and nothing more, then you can skip these next couple of steps.
We'll be installing Video.js to test if our live-stream is working without using Wordpress. This way it's more easy to troubleshoot when it turns out something is not working.
Download and unzip the latest release of video.js and optionally some plugins. Place these in a sub folder for your website like /videojs
https://github.com/videojs/video.js/releases
https://github.com/videojs/http-streaming/releases
nano /var/www/yourhostname/livestreamhls.htmlGo through the following lines carefully and adjust all the lines so it will work for your situation. Basically just edit all the lines that contain "yourhostname" and replace it with your host name once again.
<!DOCTYPE html>
<html>
<head>
<meta charset=utf-8 />
<title>LiveStream</title>
  <!--
  Uses the latest versions of video.js and videojs-http-streaming.
  To use specific versions, please change the URLs to the form:
  <link href="https://unpkg.com/video.js@6.7.1/dist/video-js.css" rel="stylesheet">
  <script src="https://unpkg.com/video.js@6.7.1/dist/video.js"></script>
  <script src="https://unpkg.com/@videojs/http-streaming@0.9.0/dist/videojs-http-streaming.js"></script>
  -->
  <link href="https://yourhostname/videojs/video-js.css" rel="stylesheet">
</head>
<body>
<center>
  <video-js id="live_stream" class="vjs-default-skin" controls preload="auto" width="auto" height="auto">
    <source src="https://yourhostname/hls/stream/index.m3u8" type="application/x-mpegURL">
  </video-js>

  <script src='https://yourhostname/videojs/video.js'></script>
  <script src="https://yourhostname/videojs/videojs-http-streaming.js"></script>

  <script>
    var player = videojs('live_stream');
  </script>
 </center>
</body>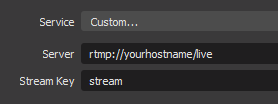
</html>Fire up you OBS, or any other live-stream app, and in the settings you need to set a custom server address for your stream that will look something like this: "rtmp://yourhost.example.com/live" and as stream key use: "stream". As seen on the example image here.
Now start streaming from OBS and have a look at the livestreamhls.html file we just created:
http://yourhostname/livestreamhls.htmlIf all went well you should see your live-stream appear within a several seconds. If it doesn't work, I suggest you go through all the steps again and find out where it went wrong. Remember to use nginx -t for troubleshooting. Fix it before continuing to the next step.
14. SETTING UP WORDPRESS
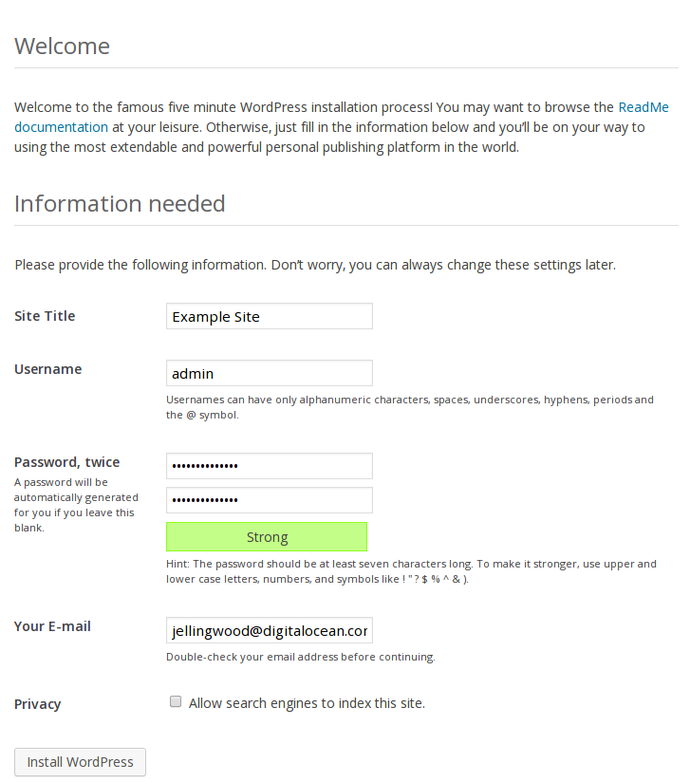
Get the latest package file from the official Wordpress site and unzip all the files from the Wordpress folder inside the archive to your website's root folder (in our case /var/www/yourhostname) and set the correct owner/group.
chown -R www-data:www-data /var/www/yourhostnameNow let's start the Wordpress installer. Just go to your website's address and you should see the first page of the installer with a menu to choose your language there. Go through the install and if you didn't forget the database login details, then you should now have your Wordpress site set up! Good job!
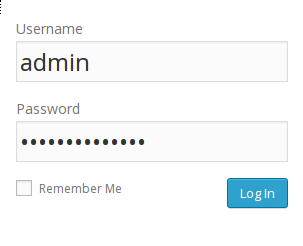
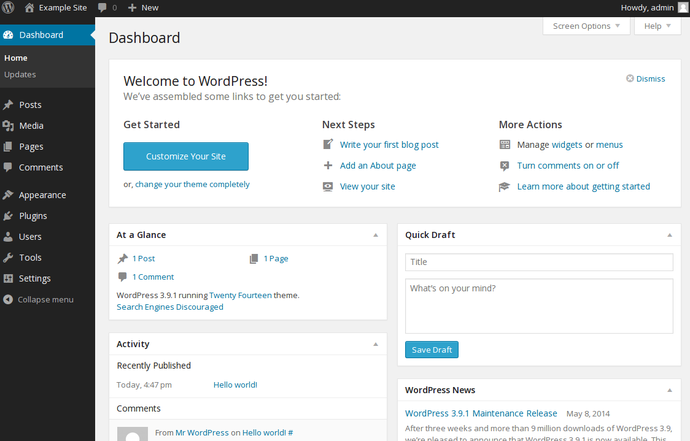
Once you're logged in you should see the admin panel for Wordpress.
15. INSTALL HLS VIDEO PLAYER PLUGIN FOR WORDPRESS
There are many different plugins out there that will provide you with a video player that can show HLS streams. In this example I choose to use Video.js HLS Player. Now if I'm not mistaking, this plugin is rather old, so I strongly advise you to try out several different plugins to see which one most suits your needs. If you choose to use the same one as I did, all you have to do is add the following to any page or post once you've enabled the plugin, to show the player.
[videojs_hls url="https://yourhostname/hls/stream/index.m3u8" width="1280" inline="true" autoplay="true"]Now visit that page in your browser, and if you are live-streaming at that moment, you should see your stream. So this actually completes this guide. I hope it was useful for you. I had fun making it because I'm aware that many people will really appreciate this guide. And that's good enough for me. Keep an eye out for future how-to video's by subscribing to my YouTube. Hope to see you soon!
Here are several interesting links that helped me to set up this guide:
- https://github.com/videojs/video.js
- https://github.com/videojs/http-streaming/releases
- https://www.npmjs.com/package/videojs-contrib-dash
- https://www.npmjs.com/package/videojs-playlist-ui
- https://www.npmjs.com/package/videojs-seek-buttons
- https://www.npmjs.com/package/videojs-logo
- https://www.npmjs.com/package/@leochen1216/videojs-chromecast
- https://www.npmjs.com/package/videojs-playlist
- https://videojs.com/plugins
- https://nl.wordpress.org/plugins/bradmax-player/
- https://nl.wordpress.org/plugins/wp-video-enhanced/
- https://nl.wordpress.org/plugins/videojs-hls-player/


Recent Comments