Spawn a localhost nginx live-stream server on Windows with HLS and Dash within 10 minutes!
This short guide will show you how to quickly set up a live-stream server on a Windows machine at localhost using Nginx & RTMP module that accepts RTMP input and outputs it as proper HLS and DASH streams.
I've created a YouTube video to accompany this guide, make sure to check it out. Before we begin, please be sure you're not running any app on your machine that is using port 80 and 1935 (for example, a web server like IIS). If you do, disable it first, or else Nginx will have a conflict with that app since only one process can claim a port. Now let's get started, shall we?
1. Download and unzip and run it
Download the latest release from the GitHub first: https://github.com/ustoopia/Live-stream-server-portable-Windows-Nginx-RTMP-HLS-Dash/releases. Unzip the contents of the zip file anywhere you prefer. In the example video, I've chosen C:\livestream.
Open Windows PowerShell and run it as administrator. Enter the command below, but edit first if you've picked a different location.
dir C:\livestream -Recurse | Unblock-FileNow run the "test-config.bat" file to see if Nginx finds any errors or not.

If you see the above message, then everything is good, and you can proceed by double-clicking "NGINX.exe". When you do, it might seem as if nothing is happening, but when you check your task manager, (right click on action bar and open task manager) you'll see that Nginx has two processes running.
2. Test to see if everything works
Now open your web-browser and go to address http://localhost and confirm that you see a "Welcome to Nginx for Windows" page there similar to this:

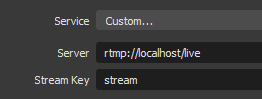
To see if live-streaming is working also, start up your live-stream client like OBS and edit the settings of the server you want to stream to. Make sure it says: rtmp://localhost/hls with live-stream key: stream. Now start streaming!
Take a look at the stat page at http://localhost/stat and make sure you can see your stream there.
Before we continue, let me inform you on the following.
3. And now for something completely different
Creating the HLS and/or Dash streams is done by writing many video fragments of the stream to your hard drive in temporary files. They get written and, depending on your playlist length and fragment length settings, get deleted again shortly after. If you are going to stream often or a lot, then you'll probably want to move this temporary folder away from your C drive, to a different drive that does not contain your operating system. Why you ask? Because the many read/writes can drastically shorten the lifespan of your drive, especially when it's the type of drive that still uses moving parts and spinning disks to store its data. This is less of an issue when your C drive is a SSD disk. But even then I would still suggest using a different drive like a D drive, or an external USB flash drive (preferably USB3) or ideally, for best performance, a secondary internal SSD drive. I typically just used a simple USB2 pen drive of at least 4GB and that works fine when you're just experimenting. If you feel this information is not 100% accurate, please let me know and leave a comment, because although I'm pretty certain it's correct, I haven't yet confirmed it a 100%.
Why not just place all the folders from the package on a separate drive and run Nginx from there? Good idea! Feel free to try if this works for you. Personally, I had some issues with running Nginx from any other drive then my C drive. I'm not sure what exactly the problem was, and I probably was too lazy to find out. But if you don't experience this, go ahead and use a different drive to store the whole package. If you have an idea what the issue could be on my end, leave a comment. Let's get back to business.
4. Moving the HLS temp folder
Open the folder that contains the Nginx.exe file and copy the "temp" folder. Paste it on a separate, different drive in any folder you prefer. Now go back to where Nginx.exe is located, and open the conf/nginx.conf file in a text editor like notepad. Search the lines that show: "variable temp/tmp_hls". Edit it so it shows the location where you previously pasted the temp folder. To give an example, change "temp/tmp_hls" to "F:/just/some/folder/temp/tmp_hls". Don't forget to stop/start the Nginx server process to implement any changes, as you should do so every time you make a change to the config file.
We're done! Your video fragment files will now be written to another drive than your precious C drive. You can now have some web player use these files to show your live-stream as HLS on a website.
Good luck! Leave any questions in the comments.


Recent Comments