Use Adaptive Bitrate live-streaming with HLS on a Nginx & RTMP setup
Prerequisites
Adaptive bit rate live-streaming allows for wider and better supported playback of your stream at any sort of device on any type of connectivity. In other words, adaptive bit rate streaming is used to make sure that your stream can be watched smoothly on whatever sort of device or platform, even if it is on a slow, low bandwidth internet connection, while at the same time still allowing HD quality playback for those that are using a faster bandwidth connection. Netflix is a great example of using this technology.
1. Considerations
For converting live streams into multiple other streams for adaptive bit-rate playback, you first need to make sure your server have enough CPU or GPU power for the workload. Otherwise the live stream will suffer from continuous delays and/or server becomes unresponsive.
Something that is worth mention here also is about the I/O limitations of some disks. If possible, for smooth streaming experience and best performance, store the generated HLS fragments to a separate high-speed SSD disk. If you want to spare your precious C drive from all these read/write activities, use a secondary D drive, or external USB drive (preferably USB3), or any flash drive. In any case, you should avoid using a disk that still uses moving parts and spinning disks as their lifespan can be drastically reduced when used for storing your video fragment files.
Then, you also need to think about what kind of resolutions you will be offering for adaptive streaming. Generally about 4 to 5 variants are good enough to provide great loading speeds for several different network speeds and devices. Here is my recommended list of variants you can use.
- 240p Low Definition stream at 288kbps
- 480p Standard Definition stream at 448kbps
- 540p Standard Definition stream at 1152kbps
- 720p High Definition stream at 2048kbps
- Source resolution & bit rate at least > 2048kbps
2. Configuring Nginx for live streaming
I'll assume you already have Nginx including the RTMP module running and that you have FFmpeg installed. If not, please use one of the other guides to do this first before returning here. Below is an example of a nginx.conf we put together that includes detailed explanations of what all the options do. It's a complete config that you can use but be aware that it's very minimal and mostly just focused on the variables for adaptive bit rate streaming & playback. A more extended and full example of a good nginx.conf can be found here.
user www-data; # Only used on linux. Nginx will run under this username.
worker_processes 1; # Set this to how many processors/cores the CPU has. Relates to "worker_connections".
pid /run/nginx.pid; # Sets the location of the process id file (used on linux only).
include /etc/nginx/modules-enabled/*.conf;	# Include all the optional configuration files stored in this folder.

events {
worker_connections 768; # Worker_processes * worker_connections = max clients. So in this setup: 1 * 768 = 768 max clients.
# multi_accept on; # "Off" will accept 1 new connection at a time. "On" will accept all new connections. Default is off.
}

rtmp {
server {
listen 1935; # The RTMP listening port. Open it in your router/firewall. Options: (addr[:port]|port|unix:path) [bind] [ipv6only=on|off] [so_keepalive=on|off|keepidle:keepintvl:keepcnt|proxy_protocol]

application live {	# Name it whatever you prefer. You will need at least one application, you can have many more.
live on; # on|off. Enables this application and allowing live streaming to it. Default=on.

## TRANSCODING USING FFMPEG EXEC ##
## The following lines will take our incoming RTMP stream and transcode it to several different HLS streams with variable bitrates  ##
## Once receive stream, transcode for adaptive streaming. This single ffmpeg command takes the input and transforms the source into ##
## 4 or 5 different streams with different bitrate and quality. P.S. The scaling done here respects the aspect ratio of the input.  ##
## EXEC - Many things are possible using exec. To learn more visit https://github.com/arut/nginx-rtmp-module/wiki/Directives#exec   ##

exec ffmpeg -i rtmp://localhost/$app/$name -async 1 -vsync -1
-c:v libx264 -c:a libvo_aacenc -b:v 256k -b:a 32k -vf "scale=480:trunc(ow/a/2)*2" -tune zerolatency -preset veryfast -crf 23 -f flv rtmp://localhost/hls/$name_low
-c:v libx264 -c:a libvo_aacenc -b:v 768k -b:a 96k -vf "scale=720:trunc(ow/a/2)*2" -tune zerolatency -preset veryfast -crf 23 -f flv rtmp://localhost/hls/$name_mid
-c:v libx264 -c:a libvo_aacenc -b:v 1024k -b:a 128k -vf "scale=960:trunc(ow/a/2)*2" -tune zerolatency -preset veryfast -crf 23 -f flv rtmp://localhost/hls/$name_high
-c:v libx264 -c:a libvo_aacenc -b:v 1920k -b:a 128k -vf "scale=1280:trunc(ow/a/2)*2" -tune zerolatency -preset veryfast -crf 23 -f flv rtmp://localhost/hls/$name_higher
-c copy -f flv rtmp://localhost/hls/$name_src;
}

application hls { # This application is for splitting the stream into HLS fragments
live on; # on|off. Enables this application and allowing live streaming to it. Default=on.
hls on; # on|off. Toggles HLS on or off for this application. Enables HTTP Live Streaming.
hls_path /tmp/hls;	# Location to store the video fragment files. Will be created if it doesn't exist.

## HLS_VARIANT - Used for variable bitrate streaming. Please read: https://github.com/arut/nginx-rtmp-module/wiki/Directives#hls_variant ##
## When hls_variant suffix is matched on stream name then variant playlist is created for the current stream with all entries specified by hls_variant
## directives in current application. Stripped name without suffix is used as variant stream name. The original stream is processed as usual.
## Optional parameters following the suffix are appended to EXT-X-STREAM-INF in m3u8 playlist. See HLS spec 3.3.10. EXT-X-STREAM-INF for full list.

hls_variant _low	BANDWIDTH=288000;	# Low bitrate, sub-SD resolution
hls_variant _mid	BANDWIDTH=448000;	# Medium bitrate, SD resolution
hls_variant _high	BANDWIDTH=1152000;	# Higher-than-SD resolution
hls_variant _higher	BANDWIDTH=2048000;	# High bitrate, HD 720p resolution
hls_variant _src	BANDWIDTH=4096000;	# Source bitrate, source resolution
		}
	}
}

http {
sendfile off; # on|off. Toggles the use of sendfile. Default=off. For optimal HLS delivery disable this.
tcp_nodelay on; # on|off. Forces a socket to send the data in its buffer, whatever the packet size. Default=on.
tcp_nopush on; # on|off. Sends the response header and beginning of a file in one packet. Default=off.
server_tokens off; # on|off|build. Toggles showing nginx version in the response header field. Default=on.
default_type application/octet-stream;	# Emit this MIME type for all requests.

server {
listen 80;
gzip off;

server_name localhost;
index index.html index.htm index.nginx-debian.html;

location / {
root /var/www/html/;
add_header Strict-Transport-Security "max-age=63072000;";
}

location /hls {
expires -1;
autoindex on;

types {
application/vnd.apple.mpegurl m3u8;
text/html html;
}
# root /tmp/;
alias /tmp/hls;

add_header Cache-Control no-cache;		# Prevent caching of HLS fragments
add_header Access-Control-Allow-Origin *;	# Allow web player to access our playlist
		}
	}
}This configuration will create five output streams. One of them being a copy of the incoming source stream. Also note the lines under the application hls that instruct the video player of the available variable bit rate streams so it can switch between them without any interruption. More on configuring a player to actively use these variables is coming in a future guide. Keep an eye out for it by subscribing to my website or YouTube channel.
3. Setting up your live-stream app
Then, configure the app you use for live-streaming (like OBS) to use these settings:
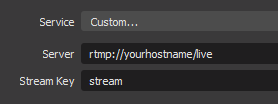
- RTMP Endpoint: rtmp://yourhostname/live
- RTMP Stream Name: (Choose whatever name you prefer)
Finally, configure your player for live playback. The full URL to your HLS manifest file would look something like this: http://yourhostname/hls/stream.m3u8
4. Recommended encoder settings for live events
The following settings can help to gain better experiences. It will also allow smooth re-streaming to YouTube. More on that subject in a future guide coming soon. These options should be set in your live-stream client, in our case OBS.
- Full HD Resolution (1920 x 1080) is recommended
- H.264 Main profile, with target bitrate of 4000Kbps, maximum 6000Kbps
- 25fps, 2s key-frame interval
- AAC audio at 196Kbps, 44.1kHz sample rate
And that's all! Good luck and enjoy your live-streaming!
This content is based on article: https://licson.net/post/setting-up-adaptive-streaming-with-nginx/


Recent Comments